
 When I found out about the Breaking Ground Blog Tour from Melissa at Mahlicadesigns, I thought the theme was very fitting with the type of sewing I’ve been doing lately. I’ve been trying out different techniques and projects to dress my growing baby bump (which is no longer a bump, it’s a full-on belly) and looking forward to what I’m going to need for this baby.
I generally sew from Big Four patterns or draft things myself, so I decided I would try out an indie pattern designer this time. I was immediately drawn to A Sparkly Baby on etsy, purely due to the name. I quickly found the pattern for the Baby Wearing Hoodie and made my purchase.
 This was my second time only sewing from a PDF pattern, so I was a little apprehensive. This experience might change my mind! This pattern designer cleverly used the layers function in adobe to give you the option to print only the lines you need. When I discovered the pattern was unisex, I knew I had to make one for my husband as well as me. (I have the acute inability to use a pattern only once.) Luckily, we were only one size apart, so I was able to easily select our two sizes and print out a neat pattern with one black line (for me) and one blue line (for him). A Sparkly Baby won some major points in my book with that.
 I decided I would make two sort-of wearable muslins, one for each of us. I knew that this pattern was pretty basic and I could likely make something passable on the first go, so I decided to start with a cheaper fleece version for each of us. I started with mine as I wasn’t in love with the fleece I bought myself and had other plans for a thicker baby-wearing top, so if my first draft didn’t turn out, it was no biggie.
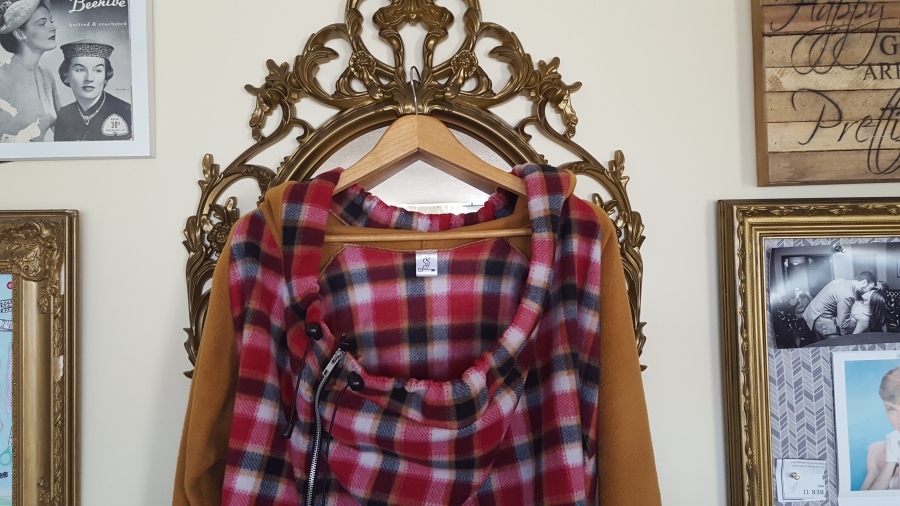
 Before even making the muslin, I made a few changes. I knew that pulling a hoodie over my head while wearing a baby seemed like it would be complicated, so I added a zipper. This wasn’t too complicated to change. I traced the front piece of the hoodie pattern a second time and attached the two where normally the pattern would be placed on the fold. Then, I traced a straight line, parallel to the fold line close to one side. I made sure to take into account the seam allowance and added an inch of space between the seam and where the zipper would run. Last, I sliced down that line and added 5/8 seam allowance down both sides. I decided I would just forgo the kangaroo pocket as it seemed too complicated to deal with.
 Adding the actual zipper wasn’t actually too complicated, I just massively mis-judged what length zipper I would need. I had forgotten to take into account the extra length the ruching in the baby-wearing option would add. Luckily, I had a 80 cm zipper in my stash to try in my muslin. I still had to gather the fabric a bit to make the zipper fit, but that helped anyway to deal with the stretch in the fabric.
 My muslin turned out okay, but I didn’t bother finishing it as there were a few fit things I wasn’t too excited about. Luckily, though, since Mike would only wear the next size up, I was able to fit him using this version, too. We also got to discuss features we wanted to add or adapt. Once putting the sweater on him, we decided the hood needed to be a little deeper, so I added two inches to it. I also noticed the back of the collar dipped quite a bit ( I think this is my fault, not the pattern, as I now believe I cut out the “scoop neck” option instead of the higher collar). We also decided that drawstrings in the hood and cowl would be really useful. Mike also advocated for sleeves with thumbholes (he is ridiculously tall and NEVER gets to use fun things like thumbholes). Lastly, he lamented the lack of pocket.

Mike decided on plaid for part of the fleece version of his sweater. I took the last 1.5 m on the bolt hoping it would be enough to match plaids. It was juuuuust enough, and all would have been fine, except in cutting everything on one layer to match plaids, I cut two identical side panels instead of mirror images. And I even checked to make sure I didn’t do just that. Sigh. At that point, there was nothing left over to recut from, so I just turned the fabric inside out. Luckily, the wrong side isn’t too different from the right side, but I will always see it.


The thumbhole tutorial in the pattern was fairly easy to follow. I learn best from videos, so normally, I would head to youtube if I don’t understand something immediately when reading the directions. I decided to stick it out and managed to get through it. After figuring it out once, it was ridiculously easy. Mike’s only complaint is that the holes themselves are too small and that the cuffs would be more comfortable with more space between the hole and the sleeve. Both easy fixes for next time.
 The part I actually found the most satisfying was the drawstrings on the hood. I sew very little that involves drawstrings and so was surprised to see how inexpensive elastic cord, sliders and drawstring ends cost. All in, the draw strings cost about $4, but serve a very practical function. I also really like those button holes and I’m not sure why.
 Overall, I liked this pattern and am excited to make a lighter version for Mike and a lighter version for me. Without adding the zipper, I would say this is a very easy pattern and even beginners could tackle this project (especially if working with fleece).
Check out the other bloggers participating in the Breaking Ground Blog Tour!
Monday March 20
http://annemarisews.wordpress.com
http://sewingbyti.blogspot.com
http://musingsofaseamstress.com
http://www.EmbraceEveryday.com
Tuesday March 21
https://mahlicadesigns.wordpress.com
https://kaleidothought.wordpress.com
http://pearberrylane.wordpress.com
Wednesday March 22
http://rainydayparent.blogspot.ca
http://annemarisews.wordpress.com
http://sproutingjj.blogspot.ca
Thursday March 23
https://mahlicadesigns.wordpress.com
http://sproutingjj.blogspot.ca
Friday March 24
https://mahlicadesigns.wordpress.com
http://annemarisews.wordpress.com
https://talesofatester.wordpress.com
http://sewingbyti.blogspot.com
http://musingsofaseamstress.com

[…] from today too! Anne-Mari Sews, Sewing By Ti, Musings of A Seamstress, Tenille’s Thread, Couturious, Embrace Everyday, Sewing A La […]
[…] Sews, Sewing By Ti, Musings of A Seamstress, Tenille’s Thread, Couturious, Embrace Everyday, Sewing A La […]
[…] tour participants! Anne-Mari Sews, Sewing By Ti, Musings of A Seamstress, Tenille’s Thread, Couturious, Embrace Everyday, Sewing A La […]
[…] Bloggers: Anne-Mari Sews, Sewing By Ti, Musings of A Seamstress, Tenille’s Thread, Couturious, Embrace Everyday, Sewing A La […]
I’m so impressed by this and I think you are so right to add a zipper. These will be so useful for the both of you.
This looks so good. The exposed zipper is a great detail and the fabric matching is well done.
[…] Sews, Sewing By Ti, Musings of A Seamstress, Tenille’s Thread, Couturious, Embrace Everyday, Sewing A La […]
Oh boy LOL. That look like it was an adventure. I have that pattern, but I haven’t made it yet. I’m glad you got it figured out though. I’d wondered about pulling the top over baby and everything LOL.
[…] the Breaking Ground Blog Tour, I made a wearable muslin out of polar fleece before making another out of a thinner knit. The idea […]
[…] during my pregnancy. Then, I made my husband two babywearing hoodies (a lighter version and a heavier fleece) using a unisex pattern which I planned to make up for […]
[…] Add a zipper to a basic hoodie pattern. […]