Welcome to my novel about the Kelly Anorak by Closet Core Patterns. JK! But it is going to be a long one, so I’m going to use subheadings to help you skip to the parts that are most relevant to you.
The back story
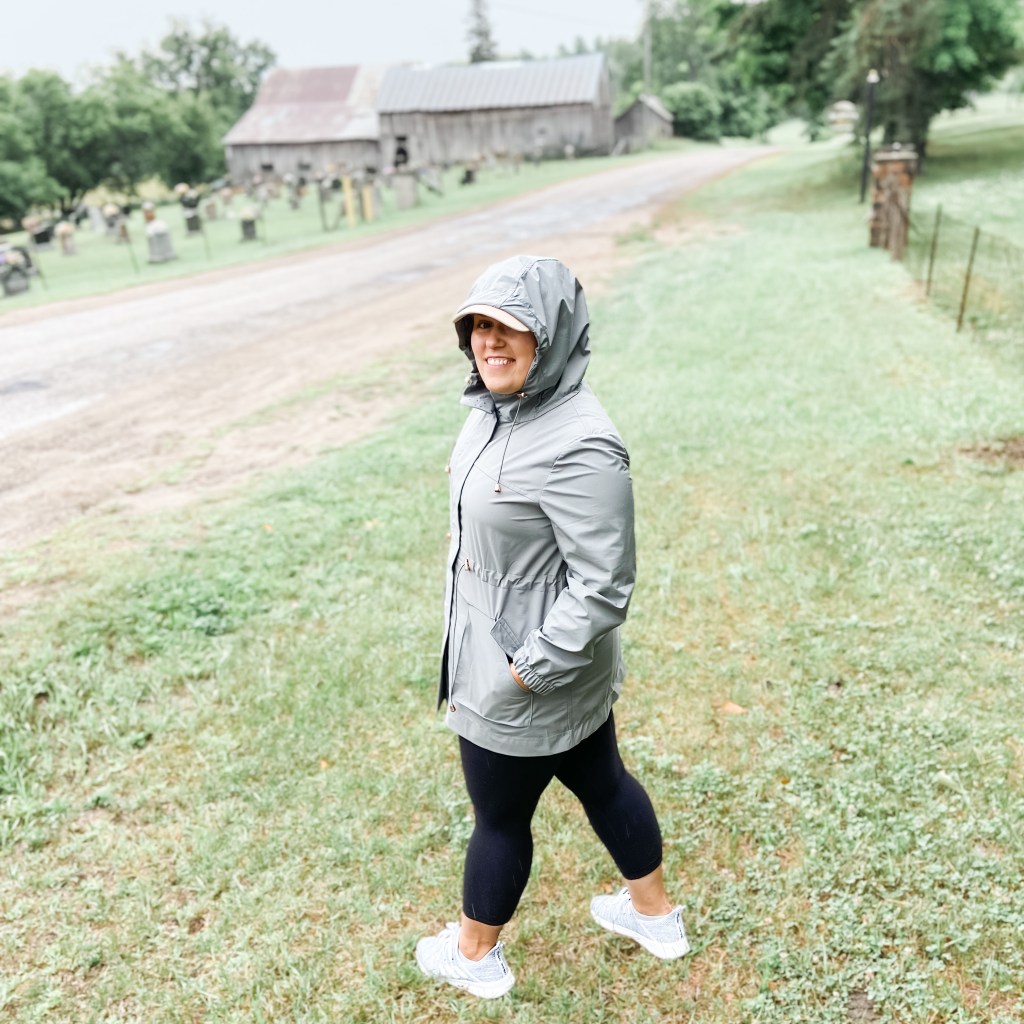
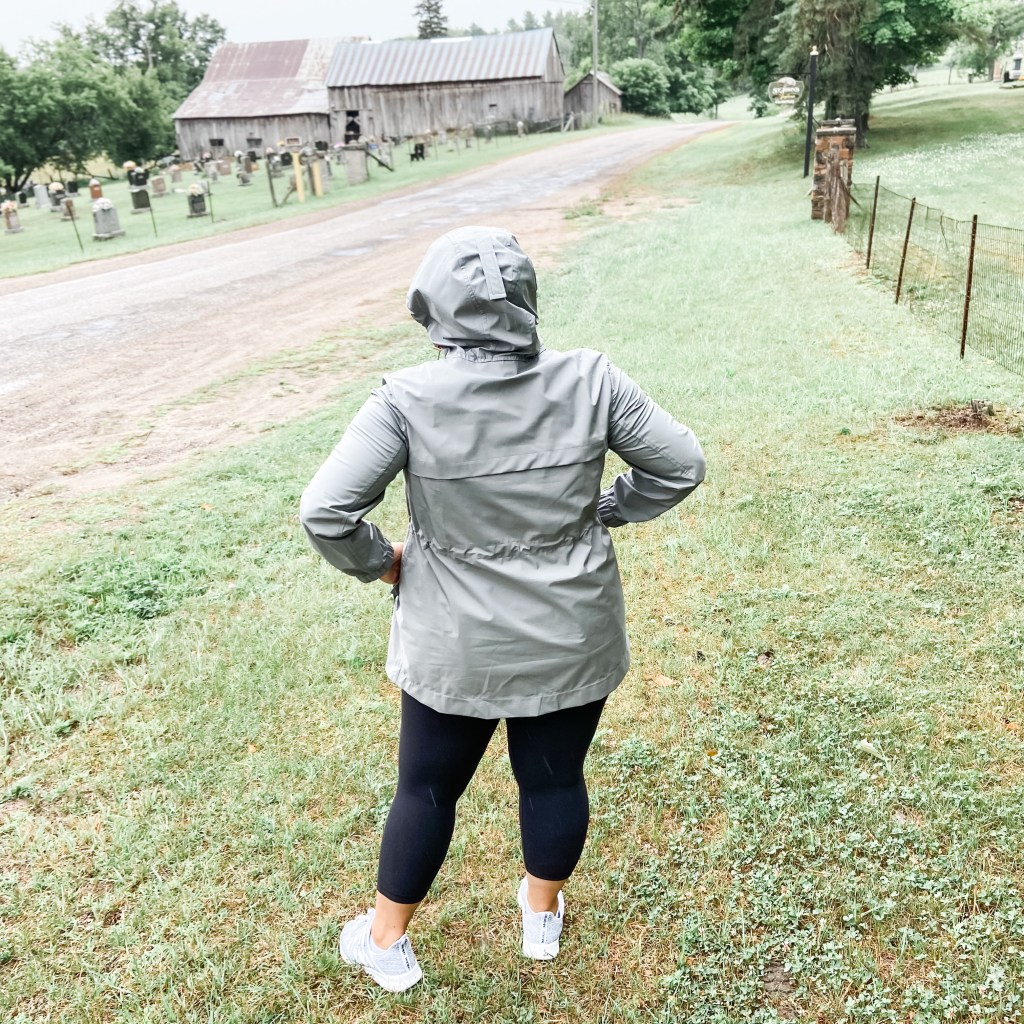
We choose not to have a car, so we walk and bike everywhere. My kids are small enough that I’m still pushing a stroller most of the time and that is basically impossible to do while holding an umbrella. A good raincoat is a necessity for me, but it is really hard for me to find a well-fitting one in stores. I’m short and grade out a good two-plus sizes from bust to hip, so jackets are either too tight on the bottom or way too big up top or the sleeves are just ridiculously long (which is such a pet peeve of mine). I’d made the Kelly Anorak two times before (a classic, lined one in cordura and a longer, fall version in twill) and figured it wouldn’t be too bad.
I bought the fabric in March 2020 (more on that later) and it took me until mid-July of this year (2021) to finish it. The main reason why I had to keep putting this project down and picking it back up was difficulty sourcing hardware and other materials. The first snag I hit was trying to find elastic cord in the spring of 2020. Everyone was making masks and I couldn’t find any anywhere. By the time I got my hands on some, the season for raincoats had passed and I had more pressing projects to work on. When I did start working on it again, I discovered that the snaps I had bought were just not going to work with my fabric. I had to decide if I wanted to buy different snaps, a press to set them, or abandon the idea entirely. I decided to go with magnetic closures (like often used in bag making) and had to wait for those to arrive.
I also had to work through a lot of hacks and finicky sewing. I’ll write more about sewing with waterproof fabric later, but suffice to say that it is slow and allows no room for error. I also had to figure out how to add several hacks (such as the magnet closures and beak in the hood) before sewing things together which took a lof of brainpower. Each step was so daunting that I just didn’t want to try. This jacket very much sucked the sew-jo out of me for a while. I finally gave myself the deadline of finishing it before we went to away to the cottage, knowing that was when I really needed a raincoat. I told myself that if I couldn’t do it by then, I would just throw it out. You know already that is not what ended up happening and I am so glad. I have never owned a better-fitting, more functional raincoat.

Sourcing fabric and hardware
If you are gearing up to make a raincoat, this is probably the hardest first step. It can be really hard to find what you need to make a quality raincoat, but not impossible. You just need to know where to look.
The fabric for this coat was a Nike Deadstock I got from Stonemountain and Daughter. It’s called Storm-fit and I bought it because it was described as light and breathable but totally waterproof. I tested the coat out in the pouring rain this weekend and can confirm that this was accurate. It’s 100 per cent polyester, but breathes and moves easily. It appears that Stonemountain and Daughter still has it in red. They have a similar one in Orange Nylon. After doing a quick google search I found a stretch woven Storm-fit with cordura at Rocky Woods, but have never ordered from them. Discovery fabrics also carries Storm-fit in several colours.
When I was sourcing hardware for my jacket, Closet Core was out of their kits. Besides, I knew I needed materials for two drawstrings and didn’t want to use cotton. This meant I had to source everything from different places. Originally, I wanted to use snaps and found some pretty rose gold ones, but in the end, that didn’t end up working with the ultra thin fabric. I ended up using magnetic purse closures which was significantly more expensive, but worth it in the end.
The rose gold snaps are still available at Goldstar tool. I also bought plastic grommets from Goldstar, but decided I didn’t want to bother fiddling with them and just used a buttonhole for my drawstring openings. I bought multiple zippers and elastic cord in differing shades of grey and multiple lengths and can’t remember where they came from, but generally, I get my zippers and elastic from Cleaner’s Supply and Mimi Fabrics. I got the magnetic closures from Emmaline bags. I got the rose gold cord stops from Mimi Fabrics as well as the cord ends, but they don’t seem to have them anymore. I did a quick search and found them at N. Jefferson Ltd., and Cindy-rella’s Sewing and Quilting in Regina.
Tips for sewing with waterproof fabric
I did a lot of research before sewing this jacket and I am really glad I did. It’s unlike any fabric I’ve ever sewn with and is extremely unforgiving. Once you’ve poked a hole in this fabric, that little perforation is there forever and it’s got no give so there is zero room for error. You can’t use pins like you normally would and you’ve got to keep watertightness in mind. Here’s a list of tips and tools that helped me:
- practice everything first because waterproof fabric performs differently
- use clips instead of pins
- use wonder tape whenever you can’t use clips (ie. often)
- try a gluestick for holding things like pockets
- test how your fabric presses. You’ll likely need no steam and low heat. And a press cloth never hurt anyone.
- you can use seam tape or a liquid seam sealant to really seal your seams, but Heather from Discovery Fabrics says that a flat felled or serged seam is enough (I asked when she presented at the Ottawa Garment Guild).This is all I did and my jacket kept me totally dry after walking in the pouring rain for an hour.
Magnet closures

As I said earlier, I had immense trouble putting in snaps until I realized that my fabric was just too thin to make them go in straight. I didn’t want to use velcro, so I bought a bunch of magnet closures (link above) that are usually used for purses. They cost about $60 for enough to do the placket and the pockets, but I think it was worth it.
The magnets were tricky to figure out, because they had to go on the pocket and inside the pocket flap before sewing either to the jacket. Not only did it take a lot of measuring to figure out where to put them, but also each set has a north and south magnet and each magnet has a right and wrong side. To hold the magnets in place while I stitched them, I used an old fashioned glue stick as neither wonder clips nor wonder tape would work. For the pockets, I was able to stitch around the outside of the plastic using a zipper foot.
Due to the bulk in the placket, I was unable to stitch all around, so I put a bar tack in each corner. Like the pockets, I had to place and stitch everything into place before finishing the plackets. This was extremely nerve-racking as I learned on the pockets that magnets always attract each other perfectly straight on, regardless of how their sewn on the fabric. On the one pocket, the flap pulls slightly to one side because my placement was off by a few millimetres.
Pocket and cuff hacks

For the pockets, I used the updated pattern piece for the “waterproof pocket” which basically has the flap as a functional flap instead of purely cosmetic. While it’s definitely not water tight, I was surprised how dry it was after walking in the rain. If you wanted a truly waterproof pocket, you’d need to add a zipper somewhere.
As for the cuffs, have loose sleeves at the wrist is one of my biggest pet peeves. On my two other (lined) Kelly anoraks, I added ribbing between the outer and lining fabrics. For this one, I simply cut out the sleeve pieces for the lined version, turned the cuff under enough to make a channel for some 1 1/4 inch elastic and threaded the elastic through. It was super simple, but very effective. You don’t want your sleeves flopping around in the rain!
Hood hacks
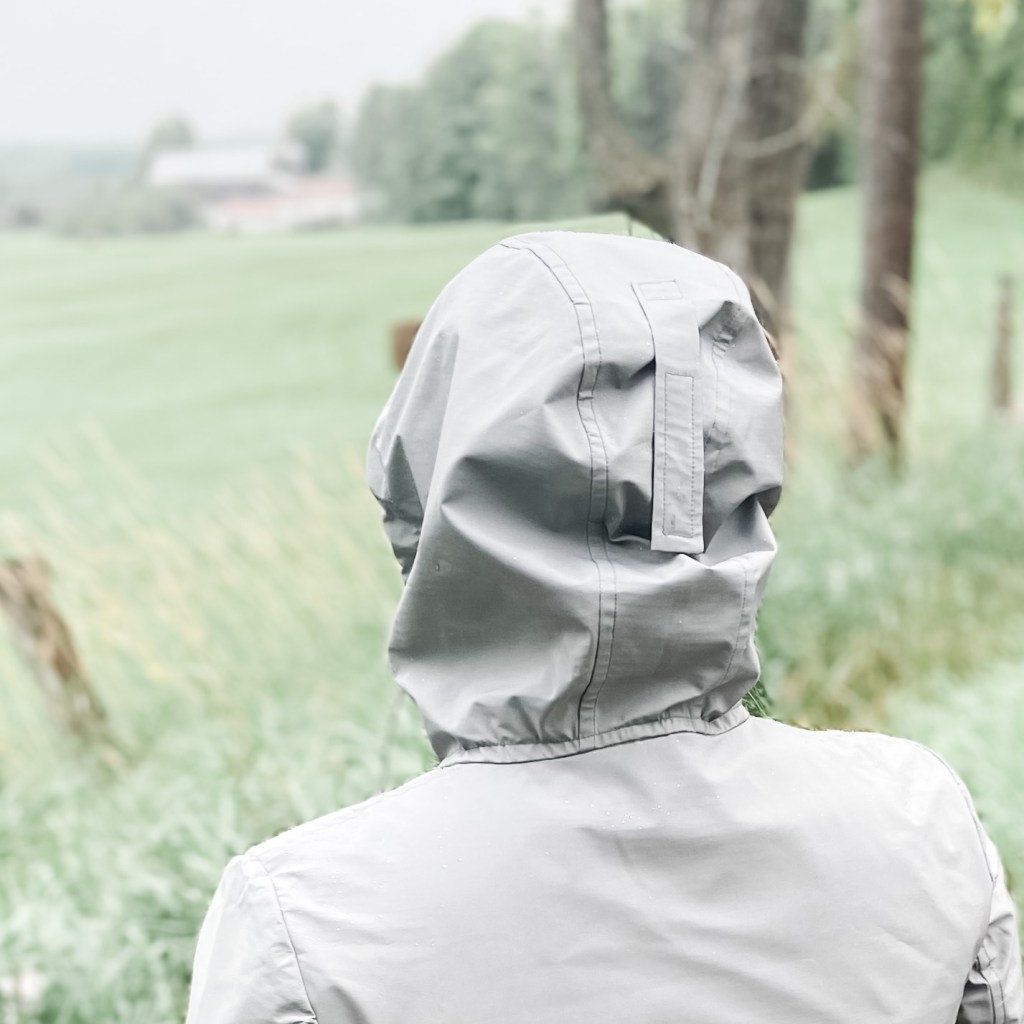
My second biggest pet peeves on a jacket is a floppy hood. I can’t stand it when my hood falls into my eyes. I also knew that having a very functional hood would be essential for this coat. I am often pushing a stroller in the rain and I can’t hold an umbrella, so I need my hood to keep the rain out of my face. I did a couple of little mods on this hood to accomplish all that.
The first change I made was added a beak to my hood. I’ve had this feature on many ready-to-wear jackets and always appreciated it. I basically extended the top of the hood a half inch by adding a little more of a curve. I used my husband’s raincoat as a guide and found I didn’t need to add as much as I thought. I also added in a crescent-shaped piece of double sided, stiff fusible interfacing to make it stand up on its own. I bought this stuff at a chain and was told it’s used to make hat brims. Because it’s so thick. you need to make sure you only apply it to the hood and don’t touch the seam allowance.
The next modification I made was adding a draw string. This is a mod I’ve done before on my burgundy cordura Kelly. You can click over to that post for details, but basically I added buttonholes just below the notch near the hood opening and top stitched the hood facing down to make a channel. If you’re going to hack this pattern, the hood drawstring is by far the easiest with the biggest impact.
The last thing I added was a little velcro strip to hold up my hood at the back. Again, this is something I’ve seen on RTW hoods in the form of elastic or velcro. All I did for this was make a little rectangle of fabric, attached a 3-ish inch length of velcro to it and a square of velcro on the hood. This allows me to adjust exactly how much I want my hood to be held up. This is key depending on how I wear my hair. Again, this is a ridiculously simple mod, but was well worth it.
In conclusion
I wanted so many times to throw in the towel and just chuck the darn thing in the trash, but I am so glad I didn’t. I’ve worn this jacket in the rain a few times now and can confidently say it checks all my boxes: it fits well; is extremely functional; and most importantly, looks cute. All around I am very, very happy with this make.
I also wanted to add a little note about the Kelly Anorak pattern in general. If you are thinking of making it for the first time, please do not let my experience scare you! I chose to use difficult fabric and hack the crap out of it and made things very hard for myself. The Kelly pattern is absolutely a great pattern to make your first coat with! Just pay attention to your fabric choice and you’ll be fine 🙂

This Kelly Anorak is amazing, Samantha! It’s so good that you stuck with this project and saw it through to completion because it came out really beautifully.
Thankyou for the detailed post. Lots of great tips. The bag magnets are a great idea for dealing with outer closure in rain. I want to make light waterproof cape and rain-skirt for cycling, but don’t like the fabric I found. Yours sounds perfect but not sure I will be able to obtain it without prohibitive shipping in Oz. At least I have a new term to search with.
Good luck!
Dear Sam,
Thank you so much for this detailed post!
Have you tried cycling in your Kellys? I’d be interested in knowing how they fit when sitting on a bike.
I sewed a Kelly out of dry waxed cotton last year as part of a SAL and when looking at options and hacks, I found your posts really helpful (this is how I found your blog and Instagram). I added drawstrings to my hood and it’s been so useful. I like the idea of adding beak. Unfortunately, the fit isn’t great (from the beginning), I had to size up and have since gained weight. I am waiting for it to come out in expanded sizing before sewing another one (or maybe I’lll make similar pattern that already comes in my size) and think a lightweight waterproof version would be great. Your tips will come in handy!
Best,
Andrea