
 My Frocktails outfit went through several forms during the planning process. but I am really happy with where it ended up. I had a lot of criteria for my outfit at first, which is why I think my first ideas didn’t seem quite right, even though they checked all the boxes. I wanted to make an outfit that would be forgiving on my constantly-changing post partum body, would accommodate breast feeding, and would work well for Frocktails and my cousin’s wedding in February. Oh, and it needed to be a quick and easy sew because I had juuuust had a baby. Simple, right?
I explored the idea of a wrap dress or a shirt dress for nursing ease, but nothing seemed right for a semi-formal occasion. I knew that a knit River dress would be easy to make and wear, but I couldn’t figure out how to make it work for nursing. Next, I decided to make a “fake” River dress by sewing a River top and making a separate skirt in the same fabric. I made the shirt, but no matter how I planned it, a plain drawstring skirt just didn’t seem right for the fabric I had.
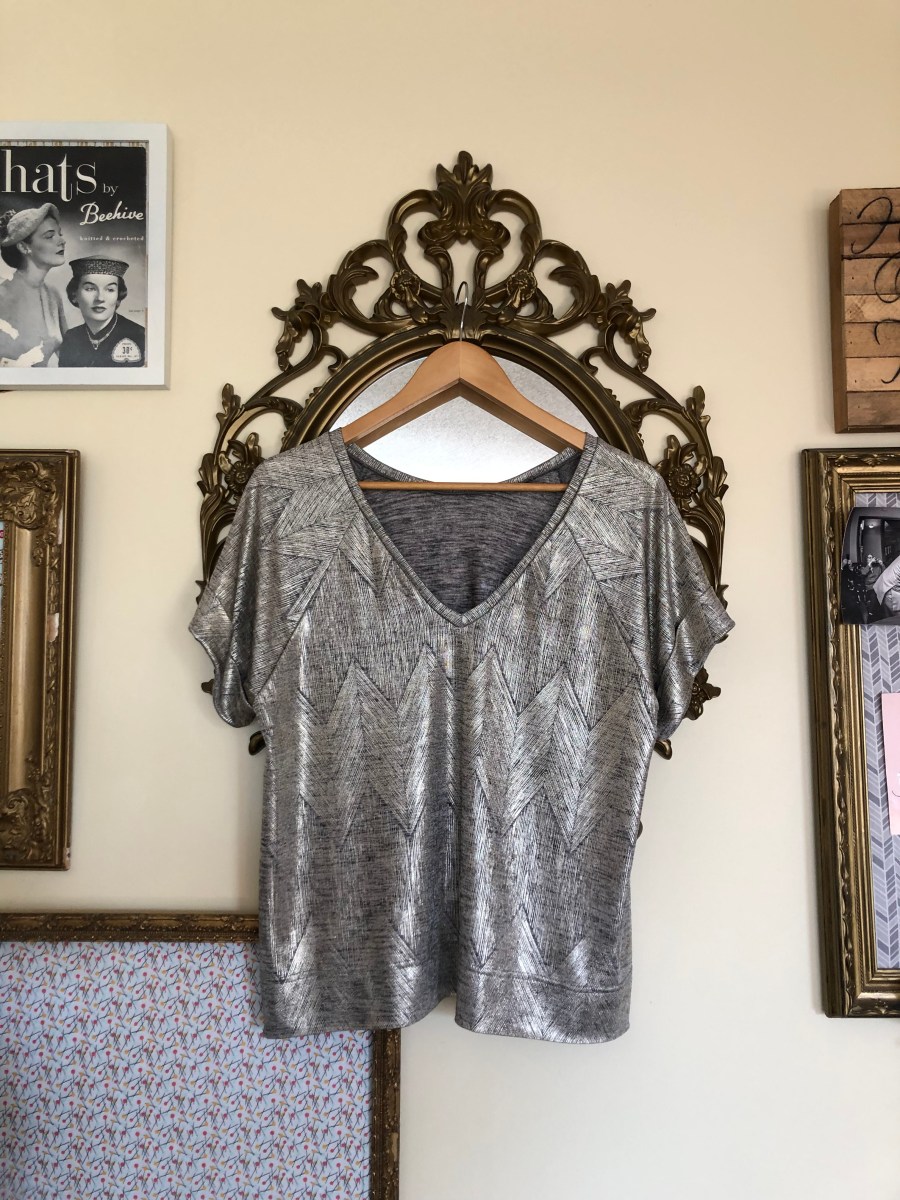 I really, really liked the idea of a pleated skirt, but I just didn’t think it would work with River top I had already made. I decided that I would make the pleated skirt and then make a new matching top (probably an Ogden cami) in the same fabric to get the same trompe l’oeil two-part dress effect. I realized, though, that this would require going back to the store and getting more fabric and I just didn’t have the time (what with a new baby and a busy toddler and all) so I dug into my stash and grabbed some lightweight black twill for the Ogden (that top is getting its own post later).
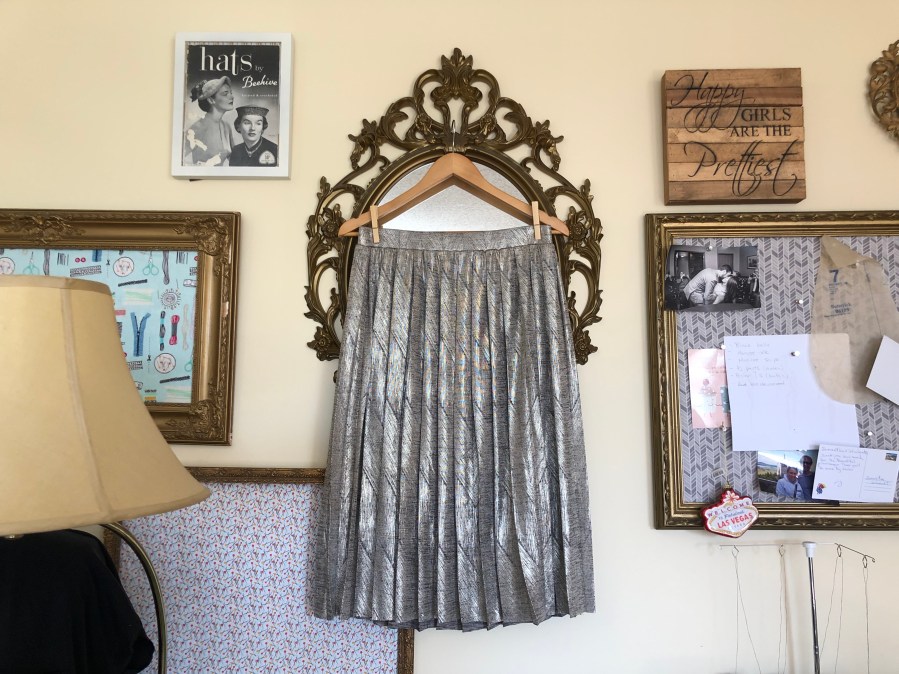
 The skirt was modeled off of one of my favourite ready-to-wear skirts I’ve loved for years. I got it at Forever 21 in New York in 2014 and found it to be the comfiest, most versatile skirt I’ve probably ever owned. The skirt is really simple – it has an elastic waist and a jersey mini-skirt under a lace, pleated midi. It’s basically just a bunch of rectangles with pleats so I figured it would be easy to recreate.
Which was not entirely true. The design is simple, but pleats are time-consuming! The fabric I used had a neat chevron design, so instead of measuring and calculating first, I started pleating, using the print as my guide, with the intention of figuring out how much I needed once it was pleated.
To pleat my fabric, I laid a huge, fluffy towel out on my sewing table to turn it into a giant ironing board. Next, I laid out my fabric and folded one pleat into place, pinned it, and pressed it (with a pressing cloth as the fabric was metallic). Keeping the pins, I folded the next pleat and repeated. Once I had done three or four pleats, I took out the pins of the first pleats and kept sort of rotating. Once I finished an entire panel, I put my huge cutting mat on top and left it there for a day to set.
Considering this fabric is 97 per cent polyester, I think it kept the pleats pretty well. If this were a natural fibre, I think this process should be enough to keep the pleats in for a long time. I haven’t washed this skirt yet, so I’m not sure what will happen to the folds, but I am told that if I dry-clean it, they will re-press the pleats for me.
 I used two panels of knife pleats to make my skirt. Each panel was as wide as half of my waist circumference plus seam allowance. Because of the pleats, it’s not neccessary to leave room for your hips as the fabric does that naturally. I usually grade out two sizes for my hips and it worked fine for me. Cut out your two rectangles and, using a zig zag stitch, baste across the top of all your pleats to hold them in place. Then sew the two panels down the sides. You should have a nice, long, pleated tube!
For my “lining” I used some black athletic knit I had laying around. Any opaque knit will work. I drafted a super basic pencil mini-skirt using my waist and hip measurements and my trusty French curve ruler. Because you are using a knit, you want some negative ease in your skirt (ie. it needs to be smaller than your measurements in order to stretch nicely over your body.) Be careful here not to add too much negative ease as a too-tight skirt will ride up and not be terribly comfortable. I started with one inch negative ease, tried my skirt on, decided it was too big, took it in a half inch on each side and repeated the process until it felt right.
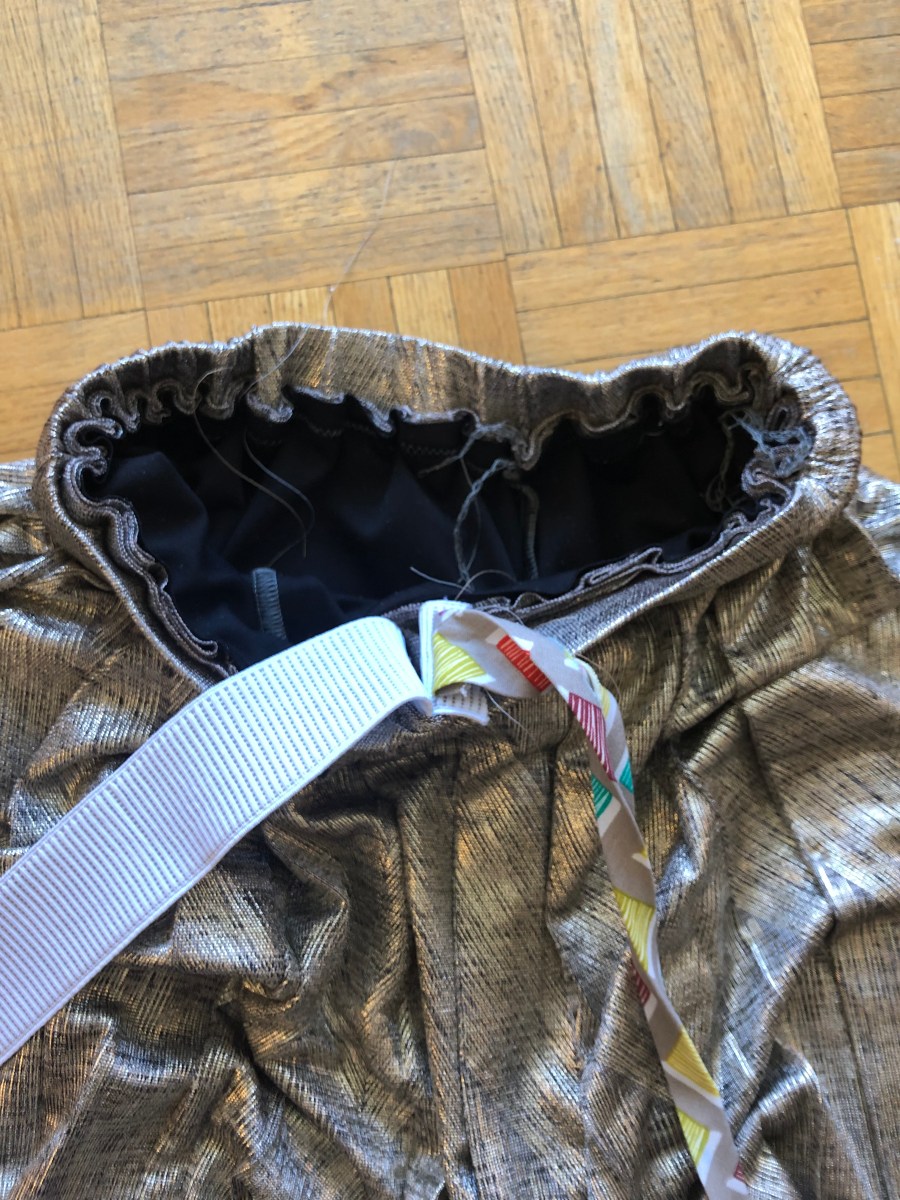 The last thing I put together was the waist band. I used 2-inch non roll elastic for my waistband, so my waistband casing was four inches wide (plus 1/2 inch seam allowance on each side to make five inches) and as long as my waist measurement minus one inch. Because I used a knit fabric, I wanted it to stretch a bit over my waist to look really smooth. Sew the short ends together to make a big circle.
 Now we baste some more. I baste my lining and my pleats together, making sure to stretch the lining evenly to match the pleated fabric. The lining should pull all the pleats in evenly so they all stay the same width at the waist. Next, I folded my waistband piece in half and baste it to my skirt at the waist, leaving a two inch gap at the centre back. Feed the elastic through the casing and try it on. Figure out exactly how tight you want the waistband to be, cut it, sew and poke it all inside the casing. Last, sew all around the waist band (for realsies, this time) including the gap you left earlier to close everything up nicely. Give the waistband a press to get the seam allowance to sit nicely and not poke the pleats out at the waist.
You may chose to hem your skirt, but if you’re using a knit, you don’t really have to. I decided not to as I was afraid it would interrupt the movement of the pleats and, honestly, I didn’t have time. I’m pretty happy with the result, but will definitely use a lighter fabric for my “lining” next time. I am definitely going to make myself another one of these skirts for spring!

Wow, you say easy, I say impressive! It’s lovely!
[…] you read last week’s post on my Frocktails outfit, you’ll know that I made this top as a third choice and sort of last […]